最近学习了一下Android NDK开发,关于Native、反射、JNI注册相关的原理已经有足量且优秀的文章,本文仅记录一下实验过程。
JNI 参数传递 JNI会把Java中所有对象 当做一个C指针传递到本地方法中,这个指针指向JVM内部数据结构,而内部的数据结构在内存中的存储方式是不可见的。只能从JNIEnv指针指向的函数表中选择合适的JNI函数来操作JVM中的数据结构。
以env->GetStringUTFChars()为例
比如native访问java.lang.String 对应的JNI类型jstring时,不能像访问基本数据类型那样使用,因为它是一个Java的引用类型,所以在本地代码中只能通过类似env->GetStringUTFChars这样的JNI函数来访问字符串的内容。
1
2
3
4
5
6
7
8
9
10
11
12
13
14
15
16
const char * GetStringUTFChars(JNIEnv *env, jstring string, jboolean *isCopy);Returns a pointer to an array of bytes representing the string in modified UTF-8 encoding. This array is valid until it is released by ReleaseStringUTFChars () . If isCopy is not NULL, then *isCopy is set to JNI_TRUE if a copy is made ; or it is set to JNI_FALSE if no copy is made.LINKAGE: Index 169 in the JNIEnv interface function table . PARAMETERS :env : the JNI interface pointer .string : a Java string object .isCopy : a pointer to a boolean .RETURNS :Returns a pointer to a modified UTF -8 string , or NULL if the operation fails .
函数接收一个JNIEnv指针,和目标String在Java层的引用,以及一个flag标识是拷贝字符串(JNI_TRUE)还是引用源字符串的指针(JNI_FALSE)。
从Native修改Java数据 最近研究了一下如何在不进行数据拷贝回传的情况下,从native层修改Java层的数据。JNI文档 可以作为在Native层使用相关函数的参考。
通过JNIEnv操纵Java对象修改 比较常用的应该是利用JNIEnv函数来操纵Java层的对象,进而获得对象的属性并修改属性值,另外还可以实现在Native层调用Java对象的方法。
主要的思路:
确定要从base64.mInputText获取输出,通过Native层的函数处理之后,赋值给base64.mOutputText.
在Native的base64decode()函数中,先通过GetClassObject(thiz)获取Java对象base64。
然后使用GetFieldID()获取base64的mInputText和mOutputText两个属性的属性ID
基于FieldID通过env-GetObjectField()获取mInputText的属性值,然后进行解码操作得到明文。
通过env-SetObjectField()把明文赋值给mOutputText。
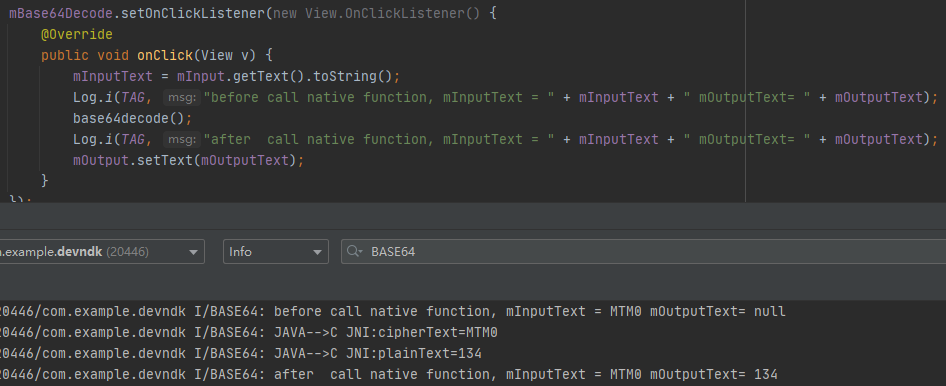
1 2 3 4 5 6 7 8 9 10 11 12 13 14 15 16 17 18 19 20 21 22 23 24 25 26 27 28 29 30 31 32 33 34 35 36 37 38 39 40 public class Base64 extends AppCompatActivity private static final String TAG = "BASE64" ; static { System.loadLibrary("base64" ); } private Button mBase64Decode, mBase64Encode; private EditText mInput; private TextView mOutput; private String mInputText, mOutputText; @Override protected void onCreate (Bundle savedInstanceState) super .onCreate(savedInstanceState); setContentView(R.layout.base64); mInput = (EditText) findViewById(R.id.base64_input); mOutput = (TextView) findViewById(R.id.base64_output); mBase64Decode = (Button) findViewById(R.id.decode_button); mBase64Encode = (Button) findViewById(R.id.encode_button); mOut2In = (ImageButton) findViewById(R.id.out2in); mClearText = (ImageButton) findViewById(R.id.clear_button); mBase64Decode.setOnClickListener(new View.OnClickListener() { @Override public void onClick (View v) mInputText = mInput.getText().toString(); Log.i(TAG, "before call native function, mInputText = " + mInputText + " mOutputText= " + mOutputText); base64decode(); Log.i(TAG, "after call native function, mInputText = " + mInputText + " mOutputText= " + mOutputText); mOutput.setText(mOutputText); } }); public native void base64decode () }
1 2 3 4 5 6 7 8 9 10 11 12 13 14 15 16 17 18 19 20 21 22 23 24 25 26 27 28 29 30 31 32 33 34 35 36 37 38 39 40 41 42 43 44 45 extern "C" JNIEXPORT void JNICALL Java_com_example_devndk_Base64_base64decode (JNIEnv *env, jobject thiz) const char *cipherText; char *plainText; jclass cls = env->GetObjectClass (thiz); jfieldID inputTextID = env->GetFieldID (cls, "mInputText" , "Ljava/lang/String;" ); jfieldID outputTextID = env->GetFieldID (cls, "mOutputText" , "Ljava/lang/String;" ); if (inputTextID == NULL ){ return ; } jobject jstr = env->GetObjectField (thiz, inputTextID); jstring jstrr = (jstring) jstr; cipherText = env->GetStringUTFChars (jstrr, NULL ); if (cipherText == NULL ){ return ; } int cipher_lens = strlen (cipherText); int plain_lens = 1 + cipher_lens * 3 / 4 ; plainText = (char *)malloc (plain_lens * sizeof char )); for (int ind=0 ;ind<cipher_lens/4 ;ind++){ int n1 = c2n (cipherText[ind*4 +0 ]); int n2 = c2n (cipherText[ind*4 +1 ]); int n3 = c2n (cipherText[ind*4 +2 ]); int n4 = c2n (cipherText[ind*4 +3 ]); plainText[ind*3 +0 ] = (n1<<2 ) + (n2>>4 ); plainText[ind*3 +1 ] = (n2<<4 ) + (n3>>2 ); plainText[ind*3 +2 ] = (n3<<6 ) + (n4); } if (cipherText[cipher_lens-1 ]=='=' ) plainText[plain_lens-2 ]=0 ; if (cipherText[cipher_lens-2 ]=='=' ) plainText[plain_lens-3 ]=0 ; plainText[plain_lens-1 ]=0 ; jstr = env->NewStringUTF (plainText); __android_log_print(ANDROID_LOG_INFO, "BASE64" , "JAVA-->C JNI:plainText=%s" , plainText); if (jstr == NULL ){ return ; } env->SetObjectField (thiz, outputTextID, jstr); }
运行结果
通过GetArrayElements()函数直接修改 对于Java的对象,用第一种方法来操纵修改应该是比较方便的。对于一些局部变量,可以考虑向Native层传入地址引用,借助JNIEnv的一些函数来实现无原始数据传输的修改。
在这里使用GetArrayElements()这类函数来实现修改。这类函数在JNI手册中介绍如下:
1
2
3
4
5
6
7
8
9
10
11
12
13
14
15
16
17
18
19
20
21
Get<PrimitiveType>ArrayElements Routines NativeType *Get<PrimitiveType>ArrayElements(JNIEnv *env, ArrayType array, jboolean *isCopy); A family of functions that returns the body of the primitive array. The result is valid until the corresponding Release<PrimitiveType>ArrayElements() function is called. Since the returned array may be a copy of the Java array, changes made to the returned array will not necessarily be reflected in the original array until Release<PrimitiveType>ArrayElements() is called. If isCopy is not NULL, then *isCopy is set to JNI_TRUE if a copy is made; or it is set to JNI_FALSE if no copy is made. The following table describes the specific primitive array element accessors. You should make the following substitutions: Replace Get<PrimitiveType>ArrayElements with one of the actual primitive element accessor routine names from the table. Replace ArrayType with the corresponding array type. Replace NativeType with the corresponding native type for that routine. Regardless of how boolean arrays are represented in the Java VM, GetBooleanArrayElements() always returns a pointer to jbooleans, with each byte denoting an element (the unpacked representation). All arrays of other types are guaranteed to be contiguous in memory. PARAMETERS: env: the JNI interface pointer. array: a Java string object. isCopy: a pointer to a boolean. RETURNS: Returns a pointer to the array elements, or NULL if the operation fails.
以GetCharArrayElements()为例,该函数接收一个jcharArray的指针p和一个用于标识是否拷贝的标志位isCopy。
1
2
3
4
5
6
7
8
9
10
11
12
13
14
15
16
17
18
19
20
21
Release<PrimitiveType>ArrayElements Routines void Release<PrimitiveType>ArrayElements(JNIEnv *env, ArrayType array, NativeType *elems, jint mode); A family of functions that informs the VM that the native code no longer needs access to elems. The elems argument is a pointer derived from array using the corresponding Get<PrimitiveType>ArrayElements() function. If necessary, this function copies back all changes made to elems to the original array. The mode argument provides information on how the array buffer should be released. mode has no effect if elems is not a copy of the elements in array. Otherwise, mode has the following impact, as shown in the following table: Table 4-10 Primitive Array Release Modes mode actions 0 copy back the content and free the elems buffer JNI_COMMIT copy back the content but do not free the elems buffer JNI_ABORT free the buffer without copying back the possible changes In most cases, programmers pass “0” to the mode argument to ensure consistent behavior for both pinned and copied arrays. The other options give the programmer more control over memory management and should be used with extreme care. PARAMETERS: env: the JNI interface pointer. array: a Java array object. elems: a pointer to array elements. mode: the release mode.
实验代码如下:
在Java层初始化char[] s = “a1234567890”
将s传入到Native层,使用env->GetCharArrayElements()进行修改,调用env->ReleaseCharArrayElements()提交修改,并适量打印中间结果。
1 2 3 4 5 6 String ss= "a1234567890" ; char [] s = ss.toCharArray();Log.i(TAG, "before test2change() called, s = " + (new String(s))); test2change(s); Log.i(TAG, "after test2change() called, s = " + (new String(s)));
1 2 3 4 5 6 7 8 9 10 11 12 13 14 15 16 17 18 19 Java_com_example_devndk_Base64_test2change (JNIEnv *env, jobject thiz, jcharArray str) { jchar * s; jint lens; s = env->GetCharArrayElements (str, JNI_FALSE); lens = (int ) env->GetArrayLength (str); __android_log_print(ANDROID_LOG_INFO, "BASE64" , "s=%x &s=%x lens=%x &lens=%x **s=%c" , s, &s, lens, &lens, *s); if (s==NULL ){ __android_log_print(ANDROID_LOG_INFO, "BASE64" , "s is NULL" ); } for (int ind=0 ;ind<lens/2 ;ind++){ s[ind] = 97 ; } env->ReleaseCharArrayElements (str, s, 0 ); }
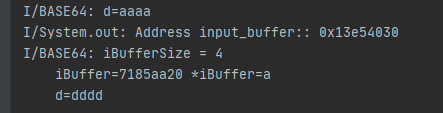
运行结果
从输出可以看到,Java层s数组最终发生变化,Native的变量s为指向Java层s数组的指针。
在Java层打印变量的物理地址(待完善) 事实上,考虑到Java Heap实际上使用的是虚拟内存 的缘故,我对s=b64b2ac0是否真的为Java层s数组的物理地址持有一定的怀疑。第三方库 (因为Android不支持Unsafe)和据说能打印物理地址的脚本 。有待探讨 ,可能是脚本并不能满足要求。
1 2 3 4 5 6 7 String ss= "a1234567890" ; char [] s = ss.toCharArray();printAddresses("Address of s" , s); Log.i(TAG, "before test2change() called, s = " + (new String(s))); test2change(s); Log.i(TAG, "after test2change() called, s = " + (new String(s)));
1 2 3 4 5 6 7 8 9 10 11 12 13 14 15 16 17 18 19 20 21 22 23 24 25 26 27 28 public static void printAddresses (String label, Object... objects) System.out.print(label + ": 0x" ); long last = 0 ; final UnsafeAndroid unsafe = new UnsafeAndroid(); int offset = unsafe.arrayBaseOffset(objects.getClass()); int scale = unsafe.arrayIndexScale(objects.getClass()); switch (scale) { case 4 : long factor = 1 ; final long i1 = (unsafe.getInt(objects, offset) & 0xFFFFFFFFL ) * factor; System.out.print(Long.toHexString(i1)); last = i1; for (int i = 1 ; i < objects.length; i++) { final long i2 = (unsafe.getInt(objects, offset + i * 4 ) & 0xFFFFFFFFL ) * factor; if (i2 > last) System.out.print(", +" + Long.toHexString(i2 - last)); else System.out.print(", -" + Long.toHexString( last - i2)); last = i2; } break ; case 8 : throw new AssertionError("Not supported" ); } System.out.println(); }
通过Direct ByteBuffer修改 有位老哥 说他用GetCharArrayElements()方法没有成功修改,阅读他的代码之后感觉是因为没有调用ReleaseCharArrayElements()提交修改导致的。不过他顺便提到了第三种修改的方法–ByteBuffer。
ByteBuffer在内存中预留指定大小的存储空间作为IO数据的临时存储,主要还是用于优化内存性能,同样可以避免在Native拷贝数据。
1 2 3 4 5 6 7 8 9 10 11 12 13 14 15 16 17 18 try { byte [] d = {97 ,97 ,97 ,97 }; Log.i(TAG, "d=" + (new String(d))); ByteBuffer input_buffer = ByteBuffer.allocateDirect(d.length); input_buffer.put(d); printAddresses("Address input_buffer:" , input_buffer); test(input_buffer); input_buffer.flip(); input_buffer.get(d); Log.i(TAG, "d=" + (new String(d))); } catch (Exception e){ e.printStackTrace(); }
1 2 3 4 5 6 7 8 9 10 11 12 13 14 15 Java_com_example_devndk_Base64_test (JNIEnv *env, jobject thiz, jobject i) { int iBufferSize = env->GetDirectBufferCapacity (i); __android_log_print(ANDROID_LOG_INFO, "BASE64" , "iBufferSize = %d" , iBufferSize); char *iBuffer = (char *)env->GetDirectBufferAddress (i); if (iBuffer != NULL ){ __android_log_print(ANDROID_LOG_INFO, "BASE64" , "iBuffer=%x *iBuffer=%c" , iBuffer, *iBuffer); for (int i=0 ;i<iBufferSize;i++){ iBuffer[i]=100 ; } } else { __android_log_print(ANDROID_LOG_INFO, "BASE64" , "iBuffer = NULL" ); } }
运行结果
反射 学习反射 笔者含泪推荐廖雪峰 的教程,他从开发的角度出发,讲得非常详细且全面。
setAccessible(true) 并不是修改目标字段的访问权限,而是试图不进行安全检查访问目标字段。如果此时存在安全检查,则setAccessible可能失败。
关于几个获取Method和Field的函数的区别。
1
2
3
4
5
6
7
8
9
10
11
12
13
14
- Field getField(name):根据字段名获取某个public的field(包括父类) - Field getDeclaredField(name):根据字段名获取当前类的某个field(不包括父类) - Field[] getFields():获取所有public的field(包括父类) - Field[] getDeclaredFields():获取当前类的所有field(不包括父类) - Method getMethod(name, Class...):获取某个public的Method(包括父类) - Method getDeclaredMethod(name, Class...):获取当前类的某个Method(不包括父类) - Method[] getMethods():获取所有public的Method(包括父类) - Method[] getDeclaredMethods():获取当前类的所有Method(不包括父类) - Constructor getConstructor(Class...):获取某个public的Constructor; - Constructor getDeclaredConstructor(Class...):获取某个Constructor; - Constructor[] getConstructors():获取所有public的Constructor; - Constructor[] getDeclaredConstructors():获取所有Constructor
使用上述函数编写一个函数用于打印目标类的相关信息。
1
2
3
4
5
6
7
8
9
10
11
12
13
14
15
16
17
18
19
20
21
22
23
24
25
26
27
28
29
30
31
32
33
34
35
36
37
38
39
40
41
public void ClassInfo (String ClassName) try { Class cls = Class.forName(ClassName); Object obj = cls.newInstance(); Field[] allClassFields = cls.getFields(); for (Field f: allClassFields){ System.out.println(ClassName + ": PublicField - " + f.getName() + "=" + f.get(obj) + "(" + f.getType() + ")" ); } Field[] allClassDeclaredFields = cls.getDeclaredFields(); for (Field f: allClassDeclaredFields){ f.setAccessible(true ); System.out.println(ClassName + ": DeclaredField - " + f.getName() + "=" + f.get(obj) + "(" + f.getType() + ")" ); } Constructor[] allClassConstructors = cls.getConstructors(); for (Constructor c: allClassConstructors){ System.out.println(ClassName + ": PublicConstructor - " + c.getName() + "(" + c.getParameterTypes().toString() + ")" ); } Constructor[] allClassDeclaredConstructors = cls.getDeclaredConstructors(); for (Constructor c: allClassDeclaredConstructors){ c.setAccessible(true ); System.out.println(ClassName + ": DeclaredConstructor - " + c.getName() + "(" + c.getParameterTypes().toString() + ")" ); } Method[] allClassMethods = cls.getMethods(); for (Method m: allClassMethods){ System.out.println(ClassName + ": PublicMethod - " + m.getName() + "(" + m.getParameterTypes().toString() + ")" ); } Method[] allClassDeclaredMethods = cls.getDeclaredMethods(); for (Method m: allClassDeclaredMethods){ m.setAccessible(true ); System.out.println(ClassName + ": DeclaredMethod - " + m.getName() + "(" + m.getParameterTypes().toString() + ")" ); } } catch (ClassNotFoundException e){ Log.i(TAG, "Error : ClassNotFoundException" ); } catch (Exception e){ Log.i(TAG, "Unknown Exception" ); } }
因为需要使用方法签名确定具体调用哪个方法,所以便捷而准确地或者各个方法的签名会有利工作推进。
打开工作目录APPNAME\app\build\intermediates\javac\debug\classes,同时make project。(Android Studio Ctrl+F9即可)
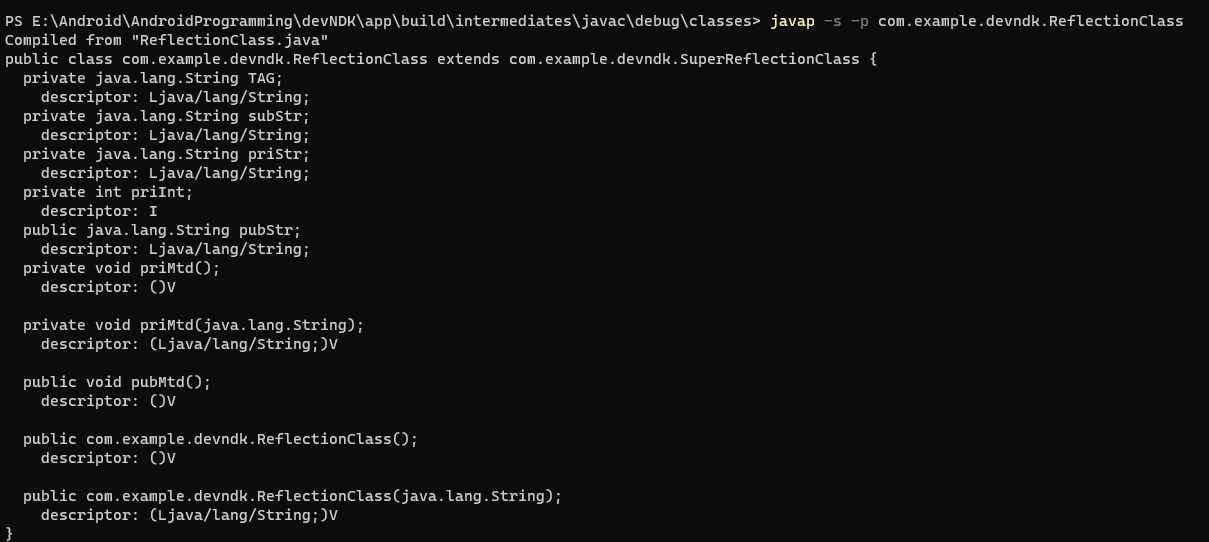
命令行 javac -s -p com.example.xxx
运行结果
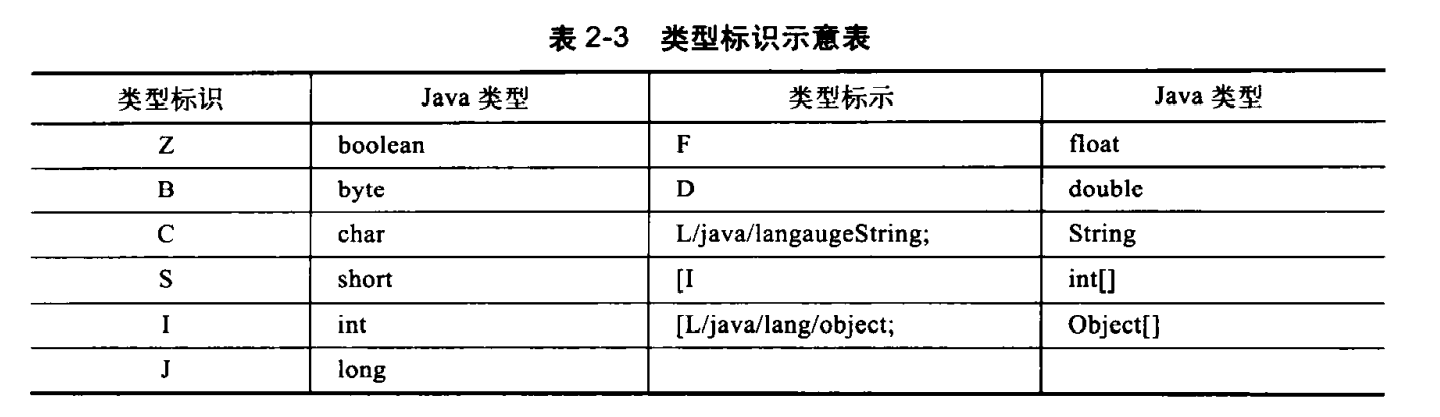
常用类型的对照表如下
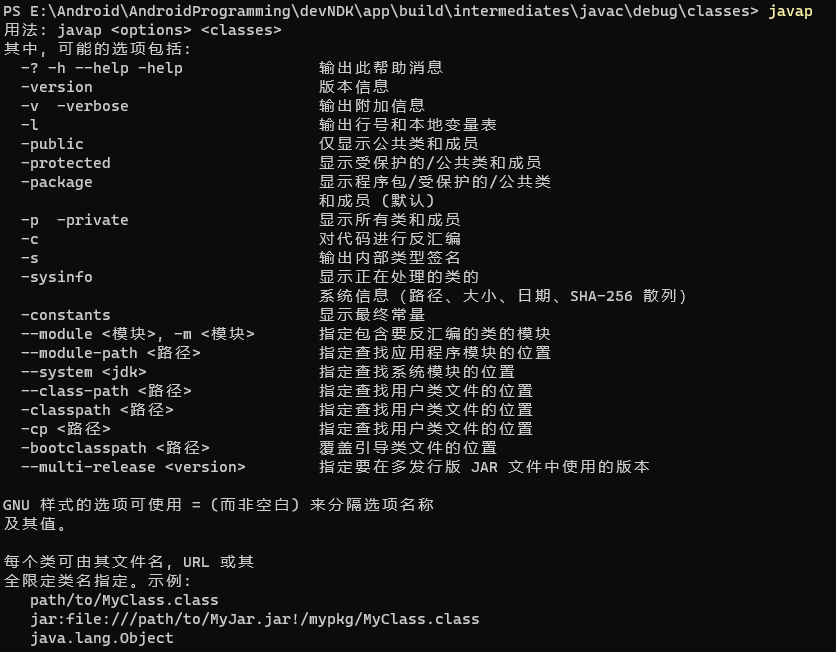
同时,javap的参数规范如下
用于测试的目标类
1
2
3
4
5
6
7
8
9
10
11
12
13
14
15
16
17
18
19
20
21
22
23
24
25
26
27
28
29
30
31
32
33
34
35
36
37
38
39
40
41
42
43
44
45
46
47
public class ReflectionClass extends SuperReflectionClass private String TAG = "ReflectionClass" ; private String subStr = "ReflectionStr" ; private String priStr = "private string" ; private int priInt = 123456 ; public String pubStr = "public string" ; private void priMtd () System.out.println("priMtd() called" ); } private void priMtd (String p) System.out.println("p = " + p + ", priStr=" + this .priStr); System.out.println("priMtd(String p) called" ); } public void pubMtd () System.out.println("pubMtd() called" ); } public ReflectionClass () this .subStr = "this is the " + this .subStr; System.out.println("ReflectionClass() called" ); } public ReflectionClass (String priStr) this .priStr = priStr; System.out.println("ReflectionClass(String priStr) called" ); } } public class SuperReflectionClass private String TAG = "superReflectionClass" ; private String priStr = "super private string" ; private int priInt = 654321 ; public String pubStr = "super public string" ; public String superStr = "superString" ; private void priMtd () Log.i(TAG, "superPriMtd() called" ); } public void pubMtd () Log.i(TAG, "superPubMtd() called" ); } public void superMtd () Log.i(TAG, "superMtd() called" ); } public SuperReflectionClass () this .superStr = "This is the " + this .superStr; Log.i(TAG, "SuperReflectionClass() called" ); } }
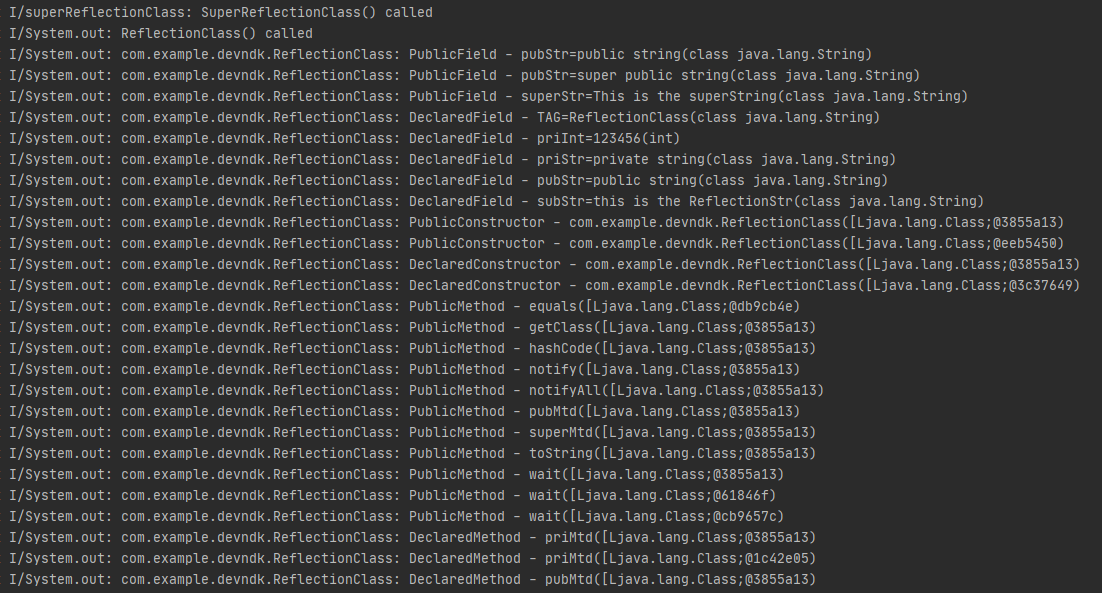
运行结果
使用反射 1 2 3 4 5 6 7 8 9 10 11 12 13 14 15 16 17 18 19 20 21 22 23 24 25 26 27 28 29 public void optObjByReflection () try { Class cls = Class.forName("com.example.devndk.ReflectionClass" ); Object obj = cls.newInstance(); Field priStr = cls.getDeclaredField("priStr" ); priStr.setAccessible(true ); System.out.println("fetch the field priStr = " + priStr.get(obj)); Method priMtd = cls.getDeclaredMethod("priMtd" ); priMtd.setAccessible(true ); priMtd.invoke(obj); Constructor c = cls.getDeclaredConstructor(String.class); Object obj1 = c.newInstance("constructor with parameters" ); Field priStr1 = cls.getDeclaredField("priStr" ); priStr1.setAccessible(true ); System.out.println("fetch the field priStr = " + priStr1.get(obj)); Method priMtd1= cls.getDeclaredMethod("priMtd" , String.class); priMtd1.setAccessible(true ); priMtd1.invoke(obj1, "PriMtd with parameter" ); } catch (Exception e){ e.printStackTrace(); } }
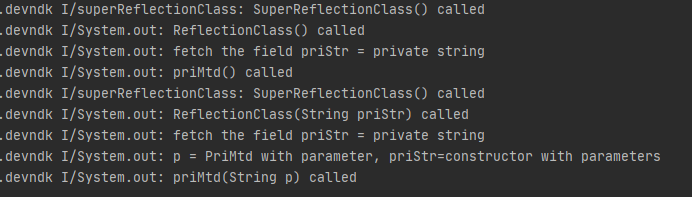
运行结果
从Native反射 除了在Java层,从Native同样也能完成反射的工作。
1 2 3 4 5 6 7 8 9 10 11 12 13 14 15 16 17 18 19 20 21 22 23 24 25 26 27 28 29 extern "C" JNIEXPORT void JNICALL Java_com_example_devndk_MainActivity_reflectByNative (JNIEnv *env, jobject thiz) jclass cls = env->FindClass ("com/example/devndk/ReflectionClass" ); if (cls == NULL ){ __android_log_print(ANDROID_LOG_INFO,"JNIMsg" , "cls = NULL" ); return ; } jmethodID constructorID = env->GetMethodID (cls, "<init>" , "(Ljava/lang/String;)V" ); if (constructorID == NULL ){ __android_log_print(ANDROID_LOG_INFO,"JNIMsg" , "constructorID = NULL" ); return ; } char s[] = "reflection from native" ; jstring ss = env->NewStringUTF (s); jobject obj = env->NewObject (cls, constructorID, ss); jmethodID priMtdID = env->GetMethodID (cls, "priMtd" , "(Ljava/lang/String;)V" ); if (priMtdID == NULL ){ __android_log_print(ANDROID_LOG_INFO,"JNIMsg" , "priMtdID = NULL" ); } env->CallVoidMethod (obj, priMtdID, ss); jfieldID priIntID = env->GetFieldID (cls,"priInt" , "I" ); if (priIntID == NULL ){ __android_log_print(ANDROID_LOG_INFO,"JNIMsg" , "priIntID = NULL" ); } __android_log_print(ANDROID_LOG_INFO,"JNIMsg" , "ReflectionClass.priInt = %d" , env->GetIntField (obj, priIntID)); }
运行结果
JNIEnv调用 在Native函数中直接通过传入的thiz对象来控制Java层调用对象会更加简单,直接借助JNIEnv结构体而不必使用反射技术。只能用于控制对应的上层实例 。
1 2 3 4 5 6 7 8 9 10 11 12 13 14 15 16 17 18 19 20 21 22 23 24 25 26 27 28 29 30 31 32 33 public class MainActivity extends AppCompatActivity public static final String TAG = "MainActivity" ; static { System.loadLibrary("native-lib" ); } private String priStr="private string" ; private int priInt = 123 ; public String pubStr = "public string" ; public int pubInt = 456 ; private void priMethod () Log.i(TAG, "private Method() called" ); } public void pubMethod () Log.i(TAG, "public Method() called" ); } @Override protected void onCreate (Bundle savedInstanceState) ...... mThiz = (Button) findViewById(R.id.thiz); mThiz.setOnClickListener(new View.OnClickListener() { @Override public void onClick (View v) optObjByThiz(); } }); } public native void optObjByThiz () }
1 2 3 4 5 6 7 8 9 10 11 12 13 14 15 16 17 18 19 20 21 extern "C" JNIEXPORT void JNICALL Java_com_example_devndk_MainActivity_optObjByThiz (JNIEnv *env, jobject thiz) jclass clz = env->GetObjectClass (thiz); jfieldID priStrID = env->GetFieldID (clz, "priStr" , "Ljava/lang/String;" ); jfieldID priIntID = env->GetFieldID (clz, "priInt" , "I" ); jmethodID priMtdID = env->GetMethodID (clz, "priMethod" , "()V" ); jobject jPriStrObj = env->GetObjectField (thiz, priStrID); jstring jPriStr = (jstring) jPriStrObj; const char *priStr = env->GetStringUTFChars (jPriStr, NULL ); __android_log_print(ANDROID_LOG_INFO,"JNIMsg" , "private string = %s" , priStr); jint priInt = env->GetIntField (thiz, priIntID); __android_log_print(ANDROID_LOG_INFO,"JNIMsg" , "private int = %d" , priInt); env->CallVoidMethod (thiz, priMtdID); }
运行结果
JNI动态注册
参考了邓凡平《深入理解Android 卷Ⅰ》第2章 深入理解JNI,推荐阅读。
在前文的JNI函数编写过程中,都是使用的静态方法来注册JNI函数。JNINativeMethod 的结构,其定义如下:
1 2 3 4 5 typedef struct { const char * name; const char * signature; void * fnPtr; }JNINativeMethod;
于是乎,JNI的动态注册的目标便是在Native层修改JNINativeMethod这个结构。
在这里,我们通过动态注册,从Native向Java对象MainActivity注册DynamicJNI()和DynamicJNI_2()两个方法 ,方法的细节如gMethods数组和它们对应的Native函数所示。env->FindClass(aimClass)找到目标,然后使用 env->RegisterNatives(clazz, gMethods, MethodsCnt)函数,完成gMethods描述的函数注册。该步骤被封装为registerMethods函数,具体实现时 记得处理异常情况 。
1 2 3 4 5 6 7 8 9 10 11 12 13 14 15 16 17 18 19 20 21 22 23 24 25 26 27 28 29 30 31 32 33 34 35 36 37 38 void native_DynamicJNI (JNIEnv *env, jclass clazz) __android_log_print(ANDROID_LOG_INFO,"JNIMsg" , "native_DynamicJIN() called" ); } int native_DynamicJNI_2 (JNIEnv *env, jclass clazz, jint a, jint b, jstring s) const char *ss; ss = env->GetStringUTFChars (s, JNI_FALSE); __android_log_print(ANDROID_LOG_INFO, "JNIMsg" , "native_DynamicNJI_2() called, received parameter from Java: s = %s" , ss); return a+b; } static JNINativeMethod gMethods[] = { { "DynamicJNI" , "()V" , (void *) native_DynamicJNI }, { "DynamicJNI_2" , "(IILjava/lang/String;)I" , (jint *) native_DynamicJNI_2 } }; #define METHODS_CNT(x) ((int) (sizeof(x) / sizeof((x)[0]))) #define AIM_CLASS "com/example/devndk/MainActivity" static int registerMethods (JNIEnv *env, const char *className, JNINativeMethod *gMethods, int MethodsCnt) jclass clazz = env->FindClass (className); if (clazz == NULL ){ __android_log_print(ANDROID_LOG_INFO, "JNIMsg" ,"FindClass() Error" ); return JNI_FALSE; } if (env->RegisterNatives (clazz, gMethods, MethodsCnt) < 0 ){ __android_log_print(ANDROID_LOG_INFO, "JNIMsg" ,"RegisterNatives() Error" ); return JNI_FALSE; } return JNI_TRUE; }
在MainActivity.java中,也需要完成相应的声明。(此时忽略Android Studio的错误提示)
1 2 3 4 5 6 7 8 9 10 11 12 public class MainActivity extends AppCompatActivity ...... public static native void DynamicJNI () public static native int DynamicJNI_2 (int a, int b, String s) public void main () ...... DynamicJNI(); int ret = DynamicJNI_2(7 ,7 , "DynamicJNI_2" ); Log.i(TAG, "DynamicJNI_2() return " + ret); ..... } }
值得讨论的是,动态注册工作在什么时候发生? 即registerMethods()函数在什么时候被调用?当Java层通过System.loadLibrary()加载完JNI动态库之后,会查找库中名为JNI_OnLoad()的函数,如果存在便调用 。
1 2 3 4 5 6 7 8 9 10 11 12 13 14 jint JNI_OnLoad (JavaVM* vm, void * reserved) { JNIEnv* env = NULL ; jint result = -1 ; if (vm->GetEnv ((void **) &env, JNI_VERSION_1_6) != JNI_OK){ return JNI_ERR; } assert (env != NULL ); if (!registerMethods (env, AIM_CLASS, gMethods, METHODS_CNT (gMethods))){ return JNI_ERR; } return JNI_VERSION_1_6; }
运行结果